Prostate Cancer Surgeries
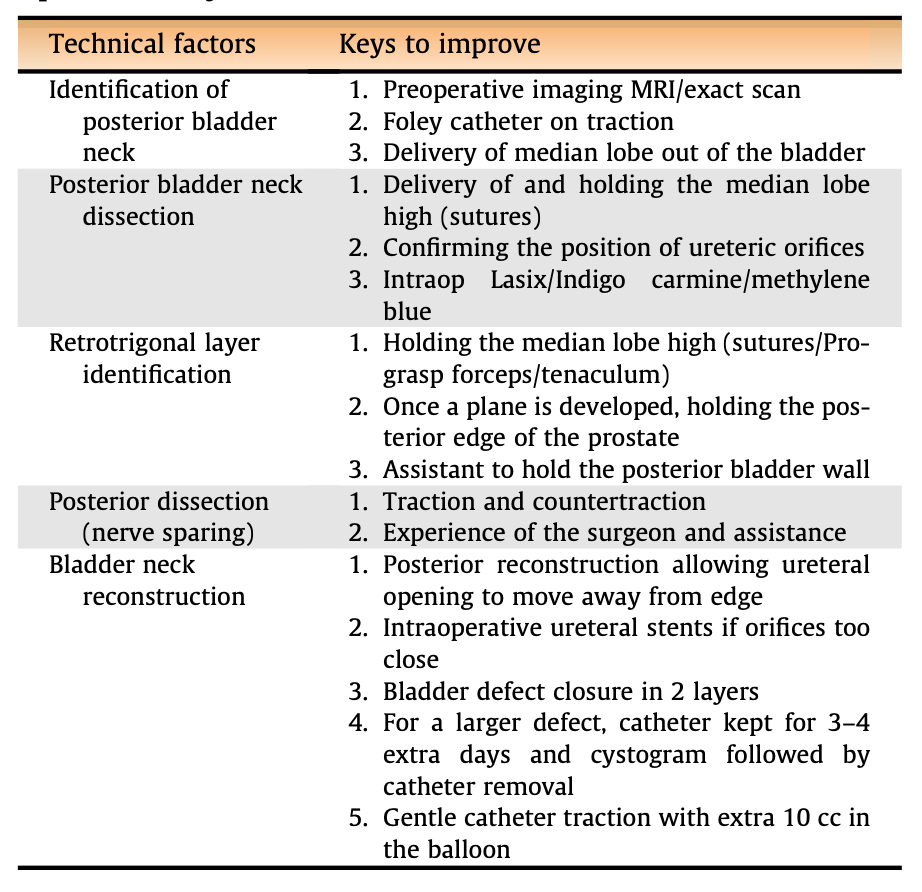
Management of large median lobe during RALP, from Wagaskar 2022
Pre-Operative preparation
Specific surgical risks for counseling
- Post-op pain
- Bleeding - need for transfusion rare
- Infection - check preop UCx
- Bowel/intraabdominal organ injury - rare
- Cancer recurrence - depends on path results
- Incontinence - most (~90-95%) regain function by 1yr, pre-op Kegels shown to help
- Erectile dysfunction - best case scenario will be at pre-surgical baseline, can take up to 2yrs to return, 50-95% regain some function with nerve-sparing approach
- Anastomotic leak
- Lymphocele - occur in up to 60% after PLND (usually asymptomatic), may require intervention in 0-16% w/ sclerosis, unroofing
- Anejaculation - expected side effect of surgery, unrelated to orgasm potential
- Climacturia - occurs in 30%
RALP Technique #1: complete anterior technique
Preparation
- Position patient supine split leg (allows for perineal pressure)
- Ensure patient can tolerate 23-30deg trendelenberg
- Give cefazolin or culture-specific antibiotics
- Prep abdomen/genitals and drape, place foley catheter on field
Access
- Place veress needle through umbilicus, drop test, attach insufflation
- Place camera port to R of midline superior to umbilicus under direct visualization
- Place ports: robot x2 on R of midline, x1 on L of midline, large assist port superolateral to camera on L side, and 2nd assist port on L side (mirror image of 4th arm)
- Dock robot, place scissors in R, bipolar in L, grasper in 4th arm
- Take down any physiologic attachments preventing the bowel from moving superiorly
Initial anterior dissection
- Bipolar medial umbilical ligaments, then cut through on anterior abdominal wall
- Once window created through peritoneum, bluntly enlarge prevesical space to drop bladder
- Continue enlarging window with blunt dissection until pubic bone visualized down to perivesical gutters
Pelvic lymph node dissection
- Place bladder on superior traction with 4th arm, then open peritoneum lateral to medial umbilical ligament
- Bluntly separate bladder fat from pelvic sidewall fat
- Continue incising peritoneum toward iliac bifurcation (be conscious of vessels and ureter)
- When vas identified, transect proximally so it falls out of field
- Identify ureter at iliac vessel bifurcations
- LND borders: external iliac artery laterally, obturator fossa medially, iliac bifurcation proximally, and inguinal ligament distally
- Split/roll tissue off iliac artery, then continue to grasp tissue and bluntly push it off the iliac artery and vein, retracting it medially
- Bluntly dissect down into obturator fossa, bipolar small perforating vessels when found, continue until all tissue freed from fossa (easiest time to remove this tissue), identify obturator nerve at this time for future dissection
- Bipolar or place clips close to pubic bone to free off distal aspect of LN packet
- Carefully scrape LN packet off obturator nerve
- Place clips proximally to remove packet entirely
Anterior dissection continued
- Dissect off anterior prostatic fat and retract it proximally onto bladder (can send as specimen, sometimes contains nodes)
- Use catheter traction to identify bladder neck and prostatic junction, then cut through to divide prostate from bladder (can bleed a lot)
- Once urethra entered sharply, grab catheter and have assistant grab through eyehole for anterior prostatic retraction
- Use left hand to expose bladder neck to continue cutting through, then use left hand to grab lip of posterior bladder neck and continue dividing in semicircle following curve of bladder neck, making sure not to buttonhole bladder neck or leave prostate tissue behind
- Sharply cut through remaining tissue to identify vas deferens
Vas + SV + posterior dissection
- Grab vas, isolate completely from surrounding tissue by cautery and blunt dissection
- Cut vas in the middle, if cut too long/short will dangle in front of camera
- Grasp portion of SV, gently retract (will tear easily) in direction of opposite side, peel off overlying tissue with blunt dissection and cautery until SV completely exposed (can clip apical vessels to prevent nerve injury)
- Twist SVs and hand to assist for anterior retraction
- Turn scissor tips up, pull tissue posterior to prostate and incise sharply (without cautery)
- Once window created posterior to prostate (should develop easily), push down on rectum (keep scissor tips up) while pushing upwards on back of prostate with left hand until only pedicles remain
Nerve-sparing
- Bluntly dissect prostate posteriorly to identify plane along capsule
- Push neurovascular bundle off side of prostate, clip/cut remaining attachments
- No need to incise endopelvic fascia
Non-nerve-sparing
- Can incise endopelvic fascia and push levators away from prostate
- Bipolar neurovascular bundle, place clip, then cut distal to clip (avoid clips close to bladder neck)
Apical dissection
Vesicourethral anastomosis
- Use double arm V-loc suture, place both stitches at posterior midline of bladder going out/in, then place into urethra going in/out (may require perineal pressure
- Use needle driver in R arm and bipolar in L arm, switch to needle driver in L arm after 2nd stitch on L side
- Avoid rubbing instruments on pubic bone or side wall, take care not to torque on urethra to avoid tearing
- Starting on one side, continue running stitch, make sure to get mucosa with each stitch to avoid strictures
- Intermittently insert catheter to ensure catheter has not been tagged and is able to pass through
- Once anastomosis completed, perform leak test with 120mL saline, then place catheter and inflate balloon
- Can place stitches through pubic periosteum before cutting to help reapproximate urethral angle
- Place drain through 4th arm port down into pelvis if desired
Closure
- Remove ports under direct visualization
- Extract specimen by extending camera port site
- Close large incision with PDS running
- Close incisions with monocryl and dermabond
RALP Technique #2: Modified Hood technique
Preparation
- Position patient supine split leg (allows for perineal pressure)
- Ensure patient can tolerate 23-30deg trendelenberg
- Give cefazolin or culture-specific antibiotics
- Prep abdomen/genitals and drape, place foley catheter on field
Access
- Place veress needle through umbilicus, drop test, attach insufflation
- Place camera port to R of midline superior to umbilicus under direct visualization
- Place ports: robot x2 on R of midline, x1 on L of midline, large assist port superolateral to camera on L side, and 2nd assist port on L side (mirror image of 4th arm)
- Dock robot, place scissors in R, bipolar in L, grasper in 4th arm
- Take down any physiologic attachments preventing the bowel from moving superiorly
Posterior dissection
- Incise peritoneum posterior to bladder, approximately 1 instrument length anterior to rectum
- Continue enlarging incision laterally, then continue inferiorly until vas and seminal vesicles identified
- Divide vas deferens, grasp SV (can tear easily) and retract in opposite direction to expose, peel off overlying tissue using blunt dissection and cautery to divide completely
- Hand SV to assistant via lateral port for anterior retraction
- Sharply incise fascia posterior to prostate, then bluntly dissect space with scissor tips down and left hand pushing prostate anteriorly
- If performing nerve-sparing, can grasp Kittner with left hand and bluntly develop correct plane around prostate, continue until coming around anterior prostate
Anterior dissection
- Incise anterior abdominal peritoneum between medial umbilical ligaments (but do not cut ligaments)
- Open space until anterior prostate is exposed, defat anterior prostate
- US probe can be used to examine location of bladder neck vs prostate
- Divide bladder neck anteriorly using cautery and pushing on bladder neck with left arm, enter urethra (identify foley then pull out), then continue until prostate is dissected off posterior bladder heck
- Grab posterior prostate with 4th arm for retraction, then dissect neurovascular bundle and DVC off anterior prostate (leaving a "hood" of tissue)
- Identify urethra distal to prostate, divide anteriorly, divide mucosa proximally (creates an everted mucosal lip) then divide urethra distally
Vesicourethral anastomosis
- Use double arm V-loc suture and needle drivers in both arms, place both stitches at posterior midline of bladder going out/in, then place into urethra going in/out (may require perineal pressure
- Tip: avoid rubbing instruments on pubic bone or side wall, take care not to torque on urethra to avoid tearing
- Place stitch on R side (bladder then urethra) then repeat on L side, make sure to get mucosa with each stitch to avoid strictures
- Intermittently insert catheter to ensure catheter has not been tagged and is able to pass through
- Place stitches at 6, then 5/7, then 3/9, then 2/10, then 1/11, then 12 o'clock
- Use remaining stitches to close bladder tissue to overlying hood
- Close anterior peritoneal hole with running V-loc
- Perform leak test with 120mL saline, then place catheter and inflate balloon
Closure
- Place drain through 4th arm port down into pelvis if desired
- Remove ports under direct visualization
- Extract specimen by extending camera port site
- Close large incision with PDS running
- Close incisions with monocryl and dermabond
Postop management, complications, expectations
Normal postoperative course
- Antibiotic prophylaxis for catheter removal: theoretical risk for UTI, but no strong evidence for peri-catheter removal antibiotics, if giving antibiotics consider 1 day only vs 3 days (per Ehdaie 2021)
- Suprapubic catheters: no clear benefit to decreasing postoperative pain, no increased risk of anastomotic stricture (from Xia 2020)
Pelvic lymph node dissection complications
- Iliac vessel injury
- Lymphocele: often asymptomatic, place IR drain if symptomatic/infected, drain creatinine rules out urinoma, can use sclerosing agent (doxycycline/iodine) if persistent output, can create open/lap peritoneal window
- Lower extremity lymphedema: check US for DVT, if negative check CT pelvis for lymphocele
- Obturator nerve injury: impairs legg adduction
Vesicourethral anastomotic stricture (info from Britton 2023)
- Prevalence: approximately 5%, higher with open technique, postoperative urine leak, early postoperative UTI
- Management: gentle balloon dilation, aggressive endoscopic resection more likely to cause incontinence, consider robotic reconstruction of bladder neck (Y-V plasty), endoscopic failure rate 40% at 5yr
References
- Bertolo, Riccardo, et al. "Supra-pubic versus urethral catheter after robot-assisted radical prostatectomy: systematic review of current evidence." World journal of urology 36.9 (2018): 1365-1372.
- Britton, Cameron J., et al. "Vesicourethral anastomotic stenosis following radical prostatectomy: risk factors, natural history, and treatment outcomes." The Journal of Urology (2023): 10-1097.
- Ehdaie, Behfar, et al. "The duration of antibiotics prophylaxis at the time of catheter removal after radical prostatectomy: clinically integrated, cluster, randomized trial." The Journal of Urology 206.3 (2021): 662-668.
- Wagaskar, Vinayak G., et al. "Technical Tips in Managing Large Median Lobes During Robot-assisted Radical Prostatectomy." European Urology Open Science 45 (2022): 32-37.
- Xia, Leilei, et al. "Suprapubic versus urethral catheter for urinary drainage after robot-assisted radical prostatectomy." Current Urology Reports 21 (2020): 1-6.