Some people loved neuro, and some people hated it. I think it's kind of fun, because it's the specialty where you rely the most on the physical exam, and can get the most information with all sorts of maneuvers. What follows is a thorough yet succinct guide to doing a full neuro exam. I'm going more for simplicity, but there are a few great websites out there (two I like are Blumenfeld's and UCSD's websites).
The patient's mental status describes their higher cognitive function. A patient's peripheral nervous system may be intact, but they may be disoriented, delirious, or have memory loss. Mental status can be tested with the Mini Mental Status Exam (MMSE) or the Montreal Cognitive Assessment (MOCA) - instructions here. I personally use the MOCA more often. If you're in a rush for time, ask the patient for their name, location, and current time. Extra points if they know why they're in the hospital. If you have a little more time, ask them to memorize three words (I like ball, cat, tree) and repeat them after 2 minutes. They can also spell WORLD backwards or subtract 7 from 100 (AKA 100, 93, 86, 79, 72, 65).
This is my favorite part of the neuro exam! The cranial nerves can seem awfully scary because they go all different places and do lots of weird things. Sometimes, being able to correlate with the clinical exam can help you remember how they all function together. This part of the exam can be extremely important for localizing lesions.
Olfactory (CN I): This is the only nerve not normally tested during the exam. You can test it with vials of concentrated odors/spices if concerned about damage from stroke or trauma.
Optic (CN II): The optic nerve receives sensory input from the retina. Test this nerve by shining a light in one eye. If the optic nerve is intact, both pupils should constrict. If the optic nerve is damaged, the pupil on the damaged side will constrict more when light is shone in the OPPOSITE eye, but both pupils will constrict equally. Pupillary constriction is controlled by CN III (see below). If this nerve is damaged, the pupil on that side will fail to constrict, but the opposite eye will be unaffected.
Oculomotor (CN III), Trochlear (CN IV), Abducens (CN VI): These nerves control the movement of the eye in the orbit (AKA extraocular movements), with CN III controlling most of the muscles and CN IV and VI controlling one muscle each. Test these movements by having the patient hold the head still and follow your finger movements with their eyes. Damage to CN III will cause the eye to look "down and out," while CN IV will look slightly up and in, and CN VI will look inwards. Damage to individual muscles may cause the eye to look in the opposite direction, most apparent when the muscle fails to bring the eye in the correct direction. Damage to the pathway that coordinates conjugate eye movements (MLF pathway) may cause one eye to look outwards, with the opposite eye unable to look inwards towards the nose (known as internuclear ophthalmoplegia). CN III damage can also cause a dilated pupil and droopy eyelid, known as ptosis.
Trigeminal (CN V): This nerve controls sensation on the face. Test it by lightly brushing both sides of the forehead, cheekbones, and lower jaw. Ask the patient if your touch feels the same or different on both sides. CN V also controls the muscles of mastication (AKA chewing). Test this by having the patient clench the jaw and try to push it side-to-side. For extra points, test pain, temperature, and vibration.
Facial (CN VII): The facial nerve controls the facial muscles, among other things. Facial muscle strength is the easiest to test. Have the patient raise their eyebrows, clench their eyes tight, give a big smile, and puff out the cheeks.
Vestibulocochlear (CN VIII): This nerve has two functions, controlling balance and hearing. Balance is not normally tested unless the patient complains of vertigo, in which case you may want to try the Dix-Hallpike maneuver, or look for repeated eye movements in the same direction, known as nystagmus. To test hearing, perform the Rinne and Weber tests. The Rinne test involves placing a ringing tuning fork on the mastoid process behind the ear. When the patient stops hearing the sound, place the tuning fork near the external auditory canal opening and ask the patient if they can hear the fork. They will be able to hear it with sensineural hearing loss, but not conductive hearing loss. The Weber test localizes the hearing damage by placing a ringing tuning fork on the patient's forehead. Sensineural hearing loss will cause the fork to sound louder in the healthy ear, whereas conductive loss will cause the fork to sound louder in the damaged ear. Normal patients will hear the sound equal on both sides.
Glossopharyngeal (CN IX): This nerve has a few minor functions, including sensory input from the posterior oropharynx. This can be tested by placing an object (tongue depressor or Q-tip) in the back of the throat to test for the gag reflex. The gag reflex itself is controlled by CN X.
Vagus (CN X): This nerve provides countless parasympathetic functions to the internal organs, but those are extremely hard to test. The best way to test CN X is through the gag reflex and palate elevation. Weakness on one side will result in failure of the palate to elevate. Damage to the nerve may also cause changes in the quality of the voice.
Accessory (CN XI): This nerve controls the trapezius and the sternocleidomastoid. Test the trapezius by having the patient shrug the shoulders while you push down on them. For the sternocleidomastoid, place your hand on the side of the patient's face and have them turn their head into your hand. Importantly, turning the head in one direction requires use of the opposite sternocleidomastoid. Therefore, if a patient is faking weakness, they will demonstrate weakness of the wrong sternocleidomastoid!
Hypoglossal (CN XII): The last cranial nerve controls most muscles in the tongue. Have the patient stick out the tongue, then move it side-to-side. Damage to CN XII will cause the tongue to deviate to the damaged side.
Building off the MSK exam, have the patient demonstrate active range-of-motion (ROM) in the arms, legs, and back. This helps to set a baseline of the patient's abilities. Then, use passive ROM to determine the extent of the joint's abilities, in addition to the presence of rigidity and spasticity. Rigidity is consistent resistance to movement, whereas spasticity is increasing resistance with increasing effort. Finally, test the patient's strength at each major joint. It is of the utmost importance to test each joint by placing force on the part of the limb just distal to the joint. For example, if testing shoulder strength, push on the arm, not the forearm or hand. This helps to isolate the joint in question. Rate strength on a scale of 0-5: 0 = no movement, 1 = muscle contraction, 2 = movement but inability to overcome gravity, 3 = able to overcome gravity but not resistance, 4 = unable to overcome full resistance, and 5 = full strength against resistance.
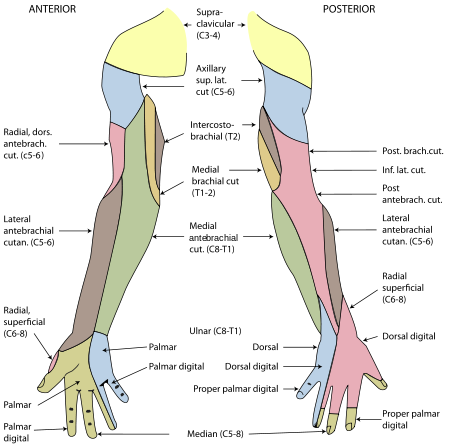
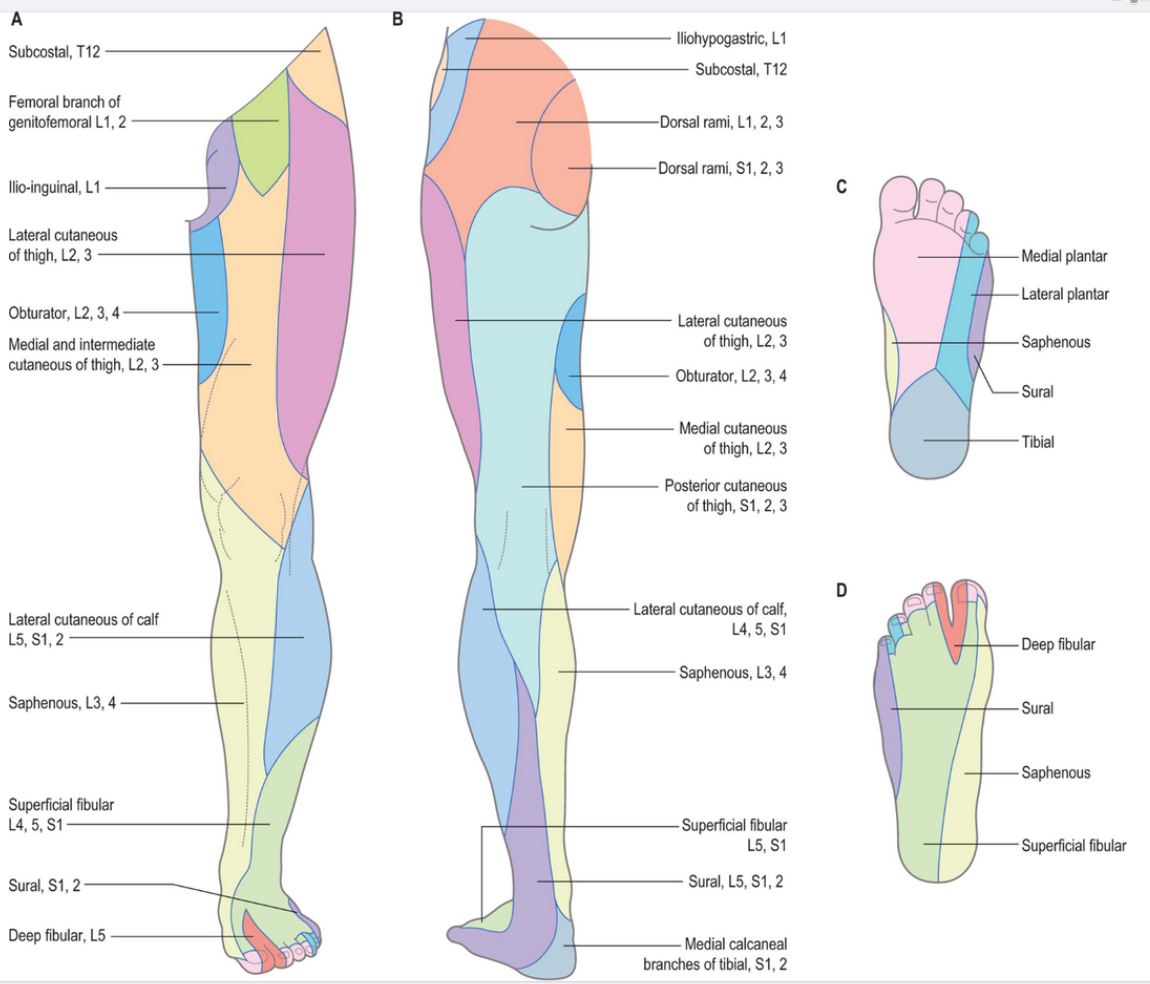
The easiest/quickest way to test sensation is with light touch. In most cases, you want to know whether the patient has lateralizing loss of sensation (implying a central cause) or loss in a specific dermatome/nerve distribution) (implying a more peripheral cause). It is easiest to test sensation at the distal portions of the limbs, as the proximal portions likely have normal sensation if the distal portions are normal. It is also not necessary to test every digit for sensation; instead, test one digit from each peripheral nerve. In the hand, I like to test the palmar 2nd digit (median nerve), dorsal 2nd digit (radial nerve), and either side of the 5th digit (ulnar nerve). In the foot, I test the medial surface (saphenous nerve), dorsal surface (superficial fibular), lateral surface (sural nerve), and plantar surface (medial/lateral branches of the tibial nerve). Here are maps of the arm and leg sensory distributions to help you remember.
Some medical students consider this the scariest part of the physical exam. Being proficient at reflexes may seem daunting, but with a little practice you can be a pro. As my clerkship neurologist told me, "the only difference between you and me, is that I've hit a lot more knees with hammers." Reflexes are tested by quickly stretching a tendon (via tapping with a hammer), sending a signal through the spinal cord which results in shortening of the muscle. It is not necessary to observe visible movement of the distal limb (AKA kicking of the foot with the knee reflex). Placing a hand on the respective muscle will allow you to sense when the muscle contracts. Just make sure you're palpating the right muscle! Make sure the patient is relaxing the muscle, don't have them hold their arm/leg in the air as the muscle will be contracted. To help distract the patient, have them grit their teeth, exhale deeply, or hook their fingers together (really hard to find a picture of) and pull outwards.
Biceps: Tests C5. Find the biceps tendon in the antecubital fossa (the inner elbow) and tap with your hammer while feeling the bicep.
Brachioradialis: Tests C6. One of the tougher reflexes to obtain. Tap the forearm a couple centimeters proximal to where you check the radial pulse. Have the hand hang down with the palm down. Tapping the tendon should cause the wrist to flex and the forearm to supinate (palm turns up). Feel the muscle contract where it attaches on the lateral side of the elbow, distal to the elbow joint.
Triceps: Tests C7. Either have the patient lay the forearm in their lap, or hold the arm in the air with the forearm dangling. Tap the tendon proximal to the elbow joint while palpating the triceps.
Patellar: Tests L4. The most well-known reflex. Tap the patellar tendon between the patella and its insertion into the tibia. For quieter reflexes, palpate the quadriceps muscle. Use the tips above to help the patient relax, and having them cross the leg over the opposite knee may help as well.
Achilles: Tests S1. Try to support the foot, which can help the muscle relax. When you tap the tendon, you should feel the foot push downwards, like pushing on the gas pedal.
The cerebellum is the part of the brain which coordinates muscle movements, via communication with the cerebrum and peripheral nerves. Loss of coordination is often seen with posterior circulation strokes and Parkinson's.
Finger to Nose: Have the patient touch their own nose with an index finger. Then, have them touch your index finger. Do this a few times, then have them switch hands. To get the best results, do a few things. Hold your finger far from the patient, so that they have to fully extend the arm to reach your finger. This will bring out intention tremors (patients hand will shake when trying to reach yours) or loss of hand-eye coordination (patient's finger will miss your finger). Make sure the patient is doing it as quickly as possible. Also move your finger to different areas, such as left, right, and in front of the patient.
Heel to Shin: For those patients that can't sit up, this test works well. Have the patient place on heel on the opposite knee, then run the heel down the shin to the ankle, then back up. Patients with cerebellar issues will have trouble doing this in a smooth motion.
"Pat-A-Cake": Another way to test coordination, as well as ability to perform complex movements. Have the patient hold one hand palm up, and have the opposite hand pat the palm, alternating with palmar and dorsal surfaces. Many patients can do this slowly, but those with a lack of coordination will be unable to do it quickly. Some patients with other lesions may forget to alternate which side of the hand they pat with.
Orbit: Similar to the other tests, but a personal favorite. Have the patient hold their fists in front of them like they're about to engage in fisticuffs. Have them rotate their hands in small circles around each other. If a cerebellar lesion is present, that hand will remain stationary and the other hand will "orbit" around it.
Romberg: The Romberg test examines the need for proprioceptive versus visual input. Have the patient stand with their arms out (palms up), feet shoulder width apart, and eyes open. Patients with poor balance will already be having difficulty standing. Ask the patient to close their eyes, removing visual input and forcing their body to rely on proprioceptive input to maintain balance. Make sure you stand near the patient to catch them if they start to fall. After a few seconds, the patient can open their eyes.
The ability to walk requires complex interaction of proprioceptive and visual input, motor control, and coordination. Observing patient's gait may reveal abnormalities not seen in other parts of the exam. Observe the patient walking normally. Look for lateralizing weakness, shuffling gait, or other abnormal patterns. Have the patient walk on the toes and heels separately, to see if there is peripheral weakness. Last, have the patient walk heel-to-toe, which requires extra coordination.